LogoLogo
Changelog
18.5
18.5
  • Welcome
    • Welcome to Airkit 👋
    • Quickstart
  • Concepts
    • Sessions
      • Linking to Sessions
    • Actors
      • Conversations with Actors
  • Tutorials
    • Building A Contact Form
      • Building the Web UI
      • Building the Database
      • Finalizing the App
      • Connecting Forms to Salesforce
    • Styles, Themes, and Templates
      • Changing the header
      • Changing the Theme
      • Using a custom font
      • Using Animations
    • Multi-Page Form
      • Creating the App Object in AirData
      • Building the Form’s UI
      • Creating the Data Flow to insert data
      • Connecting the Data Flow to the UI
      • Previewing and Publishing the app
    • Scheduling and Follow-Up App
      • Collecting Contact Information
      • Creating Appointment Times
      • Saving Appointment Information
      • Scheduling Appointment Reminder
      • Automating Proactive Follow-Up
      • Requesting Feedback
    • Custom Integrations (Petfinder App)
      • Querying the Petfinder API
      • Displaying Petfinder Data
  • Platform
    • Console
      • Apps
      • Activity
      • App Health
      • Datastores
      • Integrations
      • Conversations
      • Resources
      • API
      • Settings
    • Studio
      • Builder Bar
        • Triggers Builder
        • Web Flows Builder
        • Chat Bots Builder
        • Answer Flows Builder
        • Voice Bots Builder
        • Connections Builder
        • Notifications Builder
        • AirData Builder
        • Media Library
        • Theme Builder
        • Schedules Builder
        • Settings
      • App Preview
      • Data Flows
      • Variable Tree
      • Data Model Editor
      • Events
        • Session Started Events
        • Trigger Events
        • Control Events
        • Session Events
        • Activity Group Events
        • Action Chains
  • Data and Integrations
    • Working with Data
      • Variable Namespaces
      • Standard Session Data
      • AirData
        • AirData App Objects
        • Datastores
        • Identity Objects
        • Place Objects
        • Schedule Objects
      • Airscript Quickstart
        • Working with Dates and Times
        • Working with Missing Values
        • Working with URLs and Base64
      • Pull Values from Lists and Objects
        • Path Expressions
        • Query Expressions
      • Making Forms from Data Models
    • Integrations
      • First Party Integrations
        • Creating A Salesforce Lead
        • Creating a Zendesk Ticket
        • Creating SFTP Credentials
        • Swagger Schema Validation
        • First Party Integration Reference
          • Airtable Integration
          • Genesys Widget Integration
          • Google Integration
          • Guidewire Integration
          • Hubspot Integration
          • Kustomer Integration
          • MX Integration
          • Plaid Integration
          • Salesforce Integration
          • SendGrid Integration
          • SFTP Integration
          • Shopify Integration
          • Stripe Integration
          • Twilio Integration
          • Zendesk Integration
      • Custom Integrations
        • OAuth 2.0
        • API Token
        • HTTP Basic Auth
        • Custom Token
        • SFTP
        • Examples: Twitter and Giphy
      • App APIs
        • Building an App API
      • Subscriptions (Web Hooks)
  • Texts, Calls and Emails
    • SMS
      • SMS Notification Basics
      • Chat Bot Basics
      • Texting Journey Links
      • Data from Inbound Calls/SMS
      • Connecting Twilio Numbers
    • Emails
      • Email Notification Basics
      • Sending Emails by Data Operation
      • Connecting Email Addresses
    • Voice Bots
      • Voice Bot Basics
    • Conversation Chat Bots
      • Setting Up Answer Groups
      • Configuring Conversation Chat Bots
        • Salesforce Relays
        • Kustomer Relays
  • Web Apps
    • Forms
      • Displaying Controls Dynamically
      • Repeating Elements
      • Prefilling Forms
      • Validation of User Data
      • Capture Secure User Data
      • Progress Bars
      • Dropdown Menus
      • Electronic Signatures
    • Calendars
      • Customizing Schedule Availability
      • Using Availability Schedules
      • Rescheduling Deflected Calls
      • Integrating to External Calendars
    • Maps and Addresses
      • Maps
      • Addresses
      • User's Current Location
      • Address Search Map Binding
    • Payments
      • Creating a Stripe Integration
    • Timers and Reminders
      • Setting Timers
      • Setting up Periodic Tasks
    • PDFs
      • Creating a PDF
      • Working with Existing PDFs
      • Adding Assets to PDF
    • Assets and Media
      • Using the File Upload Web Control
      • Working with Files and Media
      • Assets and Data Operations
      • Sending Assets to Remote Servers
    • Styling Overview
      • Web Control Styling Properties
        • Animations
      • Themes and Control Variants
        • Importing and Exporting Themes
      • Working with Custom Assets
      • Page Layouts
        • Creating an App Header
    • Publishing
      • Publish and Manage Deployments
      • Configure Application Resources
      • Editing an Application
      • Importing/Exporting Apps
      • Tying Variables to Deployments
    • Advanced
      • Custom Controls
      • Creating Custom Functions
    • Accessibility
      • Accessibility in Airkit
      • Connecting Labels to Input Controls
  • Authentication
    • SAML Authentication
    • OAuth 2.0 - Google
    • OAuth 2.0 - Okta
    • OAuth 2.0 - Auth0
    • Azure AD B2C
    • Authentication Apps and Secure Apps
  • Embeds
    • SDK Overview
      • SDK Quickstart
      • SDK Authentication
      • Passing Data
      • Configuration
      • Configuration Examples
      • Airkit Lightning Component (Salesforce)
  • Analytics and Administration
    • Airkit Organizations
    • Adding Users to Airkit
    • User Roles
      • Working with Custom Roles
    • JIT Provisioning for an Organization
    • SAML SSO for an Organization
    • Managing the Application Lifecycle
    • Environments
      • Environmental Governance
    • Getting Application Metadata
    • Custom Domains
    • Analytics Overview
      • App Events to Splunk
      • App Events to AWS S3 Buckets
      • Audit Logs to AWS S3 Buckets
      • View Data in Activity Explorer
      • Snowflake Analytics Schema
      • Power BI
      • Heap and GTM Integrations
        • Setting up Analytics with GTM
        • Setting up Analytics with Heap
    • Error Management
      • Logging Errors
      • Setting up Email Notifiers
      • Integrating Error Notifiers to Slack
  • Security and Compliance
    • App Security FAQ
    • Data Masking and Auditing
    • IP Ranges
    • Encrypting Data
    • SSL Auth
    • TCPA
    • Cookie Policies
    • Supported Browsers
    • Realms
  • Reference Docs
    • Reference Documentation Overview
    • Airscript
      • Text Functions
        • CAPITALIZE
        • CONCAT
        • ISSTRING
        • LOWERCASE
        • PADSTRING
        • REPLACE
        • REPT
        • SPLIT
        • STRING_COMPARE
        • STRING_FIND
        • STRIP
        • SUBSTITUTE
        • SUBSTRING
        • TITLECASE
        • TRIM
        • UPPERCASE
      • DateTime Functions
        • ADD_TO_DATE
        • ADD_TO_DATETIME
        • DATE
        • DATETIME
        • DATETIME_DELTA
        • DATETIME_FROM_FORMAT
        • DATETIME_FROM_TIMESTAMP
        • DATE_DELTA
        • DATE_FROM_DATETIME
        • DATE_FROM_FORMAT
        • DAY
        • DAYS
        • FORMAT_DATE
        • FORMAT_DATETIME
        • FORMAT_TIME
        • HOUR
        • ISO_WEEK
        • MINUTE
        • MONTH
        • NOW
        • SECOND
        • SUBTRACT_FROM_DATE
        • SUBTRACT_FROM_DATETIME
        • TIME
        • TIMESTAMP_FROM_DATETIME
        • TIME_DELTA
        • TIME_FROM_DATETIME
        • TIME_FROM_FORMAT
        • TODAY
        • UPDATE_DATE
        • UPDATE_DATETIME
        • UPDATE_DAY
        • UPDATE_HOUR
        • UPDATE_MILLISECOND
        • UPDATE_MINUTE
        • UPDATE_MONTH
        • UPDATE_SECOND
        • UPDATE_TIME
        • UPDATE_TIMEZONE
        • UPDATE_YEAR
        • WEEK
        • WEEKDAY
        • YEAR
      • List Functions
        • CONTAINS
        • FIRST
        • FLAT
        • JOIN
        • LAST
        • LENGTH
        • REMOVE_EMPTY
        • REVERSE
        • SHUFFLE
      • Object Functions
        • KEYS
        • MERGE_OBJECTS
        • OBJECT_TO_SOAP
        • OBJECT_TO_XML
        • SOAP_TO_OBJECT
        • SOAP_HEADER_TO_OBJECT
        • VALUES
        • XML_TO_OBJECT
      • Math Functions
        • ABS
        • ACOS
        • ACOSH
        • ACOT
        • ACOTH
        • ASIN
        • ASINH
        • ATAN
        • ATAN2
        • ATANH
        • CEILING
        • COMBIN
        • COMBINA
        • COS
        • COSH
        • COT
        • COTH
        • CSC
        • CSCH
        • DEGREES
        • EVEN
        • EXP
        • FACT
        • FACTDOUBLE
        • FLOOR
        • GCD
        • ISEVEN
        • ISNUMBER
        • ISODD
        • LATLNGDISTANCE
        • LCM
        • LN
        • LOG
        • MAX
        • MIN
        • MROUND
        • MULTINOMIAL
        • ODD
        • PI
        • POWER
        • PRODUCT
        • RADIANS
        • RANDOM
        • RANGE
        • ROUND
        • ROUNDDOWN
        • ROUNDUP
        • SEC
        • SECH
        • SIGN
        • SIN
        • SINH
        • SQRT
        • SQRTPI
        • SUM
        • SUMSQ
        • TAN
        • TANH
        • TRUNC
      • Conditional Functions
        • EQUAL
        • IF
        • ISEMPTY
        • ISNOTEMPTY
        • NOT
      • Currency Functions
        • CURRENCY
        • FORMAT_CURRENCY
        • PARSE_CURRENCY
      • Phone Functions
        • FORMAT_PHONE
        • ISPHONE
        • PARSE_PHONE
      • Email Functions
        • ISEMAIL
      • Number Formatting Functions
        • ARABIC
        • FORMAT_NUMBER
        • PARSE_NUMBER
        • ROMAN
      • Data Type Functions
        • FROM_JSON
        • TO_JSON
        • TYPEOF
      • Asset Functions
        • ASSET_SIZE
        • ASSET_STATE
        • ASSET_THUMBNAIL_URL
        • ASSET_TO_URI
        • ASSET_TYPE
        • URI_TO_ASSET
      • Encoding Functions
        • BASE
        • BASE64_DECODE
        • BASE64_ENCODE
        • HMAC_MD5
        • HMAC_SHA1
        • HMAC_SHA256
        • MD5
        • SHA1
        • SHA256
        • URL_DECODE
        • URL_ENCODE
        • UUID
        • VALUE_OF
      • Error Handling Functions
        • THROW
        • TRY
      • Form and Validation Functions
        • FIRST_VALIDATION
        • RUN_VALIDATIONS
      • Arithmetic Operators
        • Addition (+)
        • Subtraction (-)
        • Multiplication (*)
        • Division (/)
        • Remainder (%)
      • Comparison Operators
        • Equality (=)
        • Inequality (<>, !=)
        • Ordering (<, <=, > , >=)
      • Logical Operators
        • AND
        • OR
        • XOR
        • Null Coalescing Operator (??)
      • Advanced Expressions
        • LET...IN
        • User Defined Functions
    • Web Controls
      • Button
      • Checkbox
      • Chat
      • Simple Checkbox List
      • Container
      • Container List
      • Credit Card
      • Currency Input
      • Date Input
      • Date Picker
      • Dropdown List
      • Email Input
      • Embedded External Content (iFrame)
      • Fieldset Container
      • File Upload
      • Form
      • Hyperlink
      • Image
      • Inline Container
      • Label
      • Map
      • Markdown
      • Number Input
      • Payment Request Button
      • Phone Input
      • Place Search Input
      • Progress Bar
      • QR Code
      • Radio Button
      • Simple Radio List
      • Scheduler
      • Secure String Input
      • Selectable Container
      • Signature Input
      • Text Area
      • Text Input
      • Time Input
      • Web Flow
      • Web Page
    • Voice and Chat Controls
      • Decision Menu
      • Forward Call
      • Secure Touchtone Capture
      • Text Response Capture
      • Touchtone Capture
    • Data Operations
      • AirData Request
        • DELETE
        • PUT
        • INSERT
        • PATCH
        • QUERY
        • DEPRECATED_QUERY
      • Calendar Search
      • Close Conversation
      • Conversation Transcript
      • Create File
      • Delete Assets
      • Download Encoded Asset
      • Early Return
      • Fetch Agent Information
      • Fetch Asset Details
      • Fetch Routing Flow Stats
      • Find Conversations by Customer Identifier
      • Fill PDF Form
      • Google
      • HTML to PDF
      • HTTP Request
        • Using an API With Paging
      • JWT Generation
      • Merge PDF
      • Move Conversation to Routing Flow
      • Opt Out Search
      • Opt Out List
      • Run Data Flow
      • Run Event in Journey
      • Salesforce
      • Secure Value Retrieval
      • Send Email
      • Send Message to Conversation
      • SFTP
      • Start Journey
      • Swagger Schema Validation
      • Transform
      • Update Customer Identifier
      • Wait
      • XML to JSON
      • Zendesk
      • ZIP File
    • Actions
      • Analytics Identify
      • Analytics Send Event
      • Close Modal
      • Condition
      • End Session
      • Extend Session Expiration Time
      • Initialize Actor
      • Log Custom Event
      • Metric: Count
      • Metric: Field
      • Metric: Start Timer
      • Metric: Statistic
      • Metric: Stop Timer
      • Navigate To Web Flow
      • Navigate to Web Page
      • Open Modal
      • Run Data Flow
      • Run Data Flow Repeatedly
      • Run Embedded Outgoing Event
      • Run Event
      • Send Email
      • Send SMS
      • Set Authentication
      • Set Identifier
      • Set Variable
      • Start Chat Bot
      • Start Voice Bot
      • Start Timer
      • Stop Timer
      • Throw
      • Trigger Form Validation
      • Try
    • Conversation Actions
      • Ask A Question
      • Capture User Response
      • Close Conversation
      • Move Customer to Resource
      • Move Conversation to Routing Flow
      • Quick Replies
      • Run Answer Flow
      • Start Conversation Chat Bot
      • Start Conversation
      • Send Link
      • Text Answer
      • Update Customer Identifier
    • Primitive Data Types
      • Any (JSON)
      • Asset
        • Detailed Asset
      • Boolean
      • Currency
      • Date
      • DateTime
      • Email
      • List
      • Null
      • Number
      • Phone
      • Text
      • Time
  • Transportation Products Catalog
    • The Transportation Products API
      • GET products
      • GET product-by-id
  • Release Notes
    • CXR Overview
    • CXR Upgrades and Migrations
Powered by GitBook
On this page
  • Overview
  • Installing the SF Package
  • Configuring CSP Trusted Sites
  • Configuring Target Hostnames
  • Setting up Airkit App
  • Config the SDK API
  • Configure the App API
  • Publishing
  • Configuring the Airkit Lightning Component
  • Configuring Incoming Events from Salesforce
  • Setting up an event when the Case record changes
  • Configuring Outgoing Events
  • Setting up the Platform Event
  • Setting up the Outbound Event in Airkit

Was this helpful?

  1. Embeds
  2. SDK Overview

Airkit Lightning Component (Salesforce)

PreviousConfiguration ExamplesNextAirkit Organizations

Last updated 1 year ago

Was this helpful?

Overview

Airkit apps can be embedded into Salesforce pages using the Airkit lightning component that can be found on the . This allows developers to quickly build out and launch personalized web apps and omnichannel experiences on top of Salesforce.

Installing the SF Package

Configuring CSP Trusted Sites

  1. Look at the top of any Salesforce page.

    • If you are using Lightning Experience, click on the gear icon, then select Setup Home.

    • If you’re using Salesforce Classic and you see Setup in the user interface header, click it.

    • If you’re using Salesforce Classic and you don’t see Setup in the header, click your name, then select Setup.

  1. Navigate to Security > CSP Trusted Sites.

  2. Create a New Trusted Site.

  1. Fill in the information under General Information:

    1. Trusted Site URL: This is the base domain of your Airkit application that you would like to pass into the lightning component. To get the base domain, Edit your Airkit app and go to Settings > Base Domain

    2. For example:

  1. Select all of the CSP Directives and click on Save.

Configuring Target Hostnames

You will need to configure Target Hostnames in your Airkit App in order to allow your app to be embedded into Salesforce.

  1. Scroll down until you see Target Hostnames.

  1. Save your App.

Setting up Airkit App

The Airkit lightning component takes in a Configuration Url which needs to be set up as a part of your Airkit application. This requires two API endpoints that you will need to configure, an App API and a SDK API.

Config the SDK API

  1. Navigate to Triggers and create a SDK API.

  1. Create a new URL Route and click on Create. You can also use an existing route as well.

  1. Click on the sdk endpoint where you will be able to build out the API.

  1. This is an SDK API which means it has preconfigured headers and properties that allow you to use with Airkit's Web SDK. To get the record's ID and object name when the Airkit lightning component is embedded into Salesforce, the endpoint will need to be modified slightly. Add two Query Params called:

    1. objectName

    2. recordId

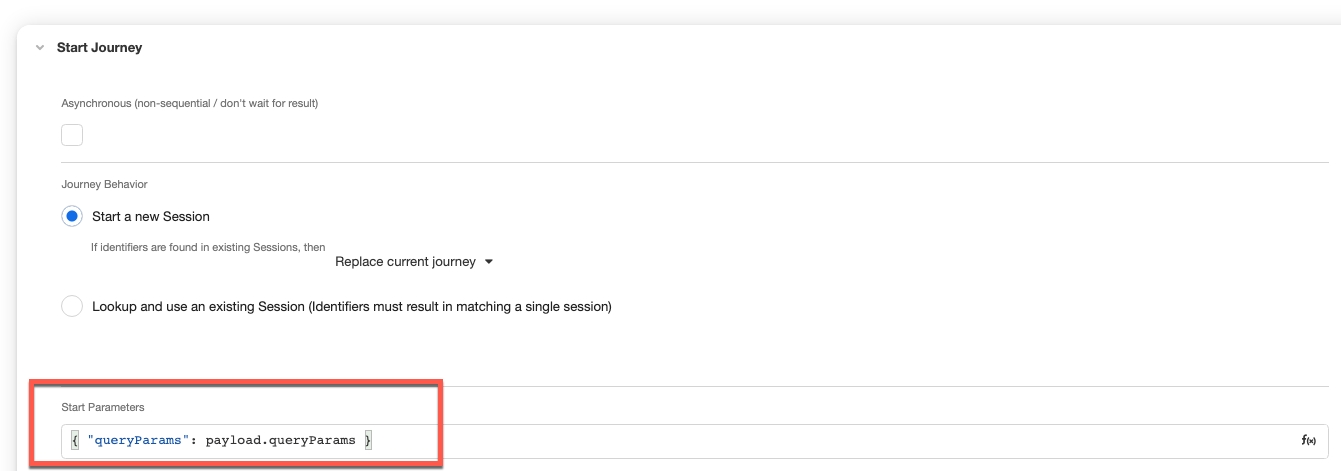
  1. Then, scroll down to the **Start Journey **data operation and under the Start Parameters you will need to add the following code block. This will allow you to access theobjectName and the recordId using session.start.queryParams.

{ "queryParams": payload.queryParams }
  1. Save your app.

Configure the App API

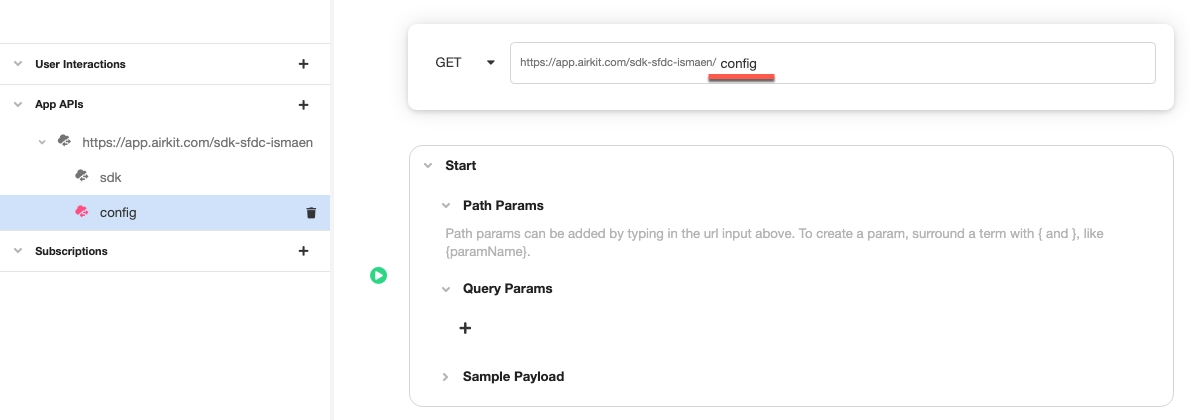
  1. Create an App API using the same URL route created in the previous step and add config to the end of the endpoint.

  1. Add a transform data operation and pass in the following. The SDK Url is the url endpoint created in the previous step.
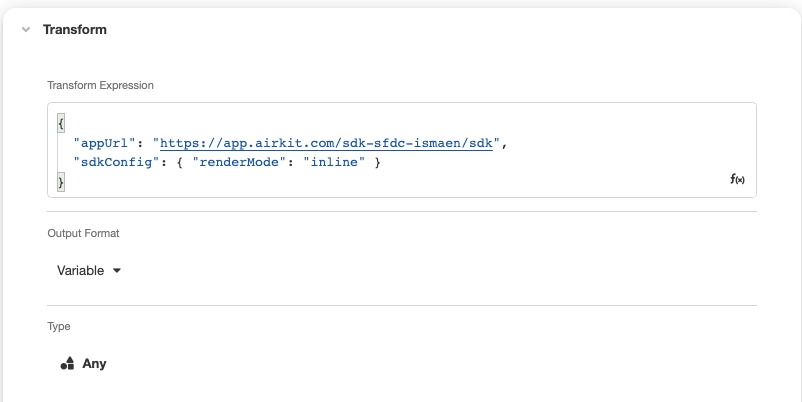
{
  "appUrl": "<SDK Url>",
  "sdkConfig": {
    "renderMode": "inline"
  }
}

  1. Configure the response of the API:

    1. Response Headers: Content-Type: application/json

    2. Response Status : 200

    3. Response Body: TO_JSON(transform)

  1. Save your app.

Publishing

  1. After your App APIs are configured, your app is ready to be embedded and published. In order to see a page render in Salesforce, your app must have a web page with some controls on the page. For this example, the web page will simply say "Hello World" and also pass in the session variable on the page.

  1. When ready to publish, click on the "Publish" button in the top right hand corner and publish your application. The API endpoint will also be published when you hit publish. This is important to pass the config endpoint into the Airkit lightning component in the following steps.

Configuring the Airkit Lightning Component

  1. Add the Airkit lightning component to a page in Salesforce. For this example, the component will be added to the Case Object page. The component has the following properties:

    1. configUrl: The config url of the Airkit app to be embedded

    2. debug: When checked, will send events to the console to assist in debugging

    3. height: A number that determines the height of the lightning component

  1. Pass in a value for the height.

  2. Save your page.

Configuring Incoming Events from Salesforce

Setting up an event when the Case record changes

Change Data Capture setup in Salesforce

  1. Go to Setup > Integrations > Change Data Capture.

  2. Select the Case entity.

  1. Save your changes.

Configuring the incoming event in Airkit

  1. Navigate to your app in the studio and go to Connections > Embedded Event Sources and add an Incoming Event Source.

  1. Add an Any variable and name it payload.

  1. Add an action to the action chain. This action chain will run whenever there is a change on the case record.

  1. Save and publish your Airkit app.

Adding the event to the Airkit Lightning Component

  1. The last step to tie it all together is to add the key to the events property on the lightning component. Add /data/CaseChangeEvent to the events property.

  1. Save your changes.

Configuring Outgoing Events

This example will walk through setting up an event to pass data into a Chatter feed on a case.

Setting up the Platform Event

  1. Go to Salesforce Setup and navigate to Integrations > Platform Events.

  1. Create a new Platform event and fill in the Platform Event Information.

  1. Save the platform event and you will see the Platform Event Definition Detail. Here you will have an API Name that will be the Identifier Key for the outgoing event in Airkit.

  1. Next, add custom fields on the platform event. These will be the fields to pass data into Salesforce. The field types should also map to the types in Airkit as well when creating the variables on the outgoing event.

  1. Fill in the Custom field information.

  1. Save the custom field. Repeat the process for recordId.

  2. Once the Custom Fields are created, you will see the API Name that gets generated from the custom fields. These will be used as a part of the Apex trigger and also the Airkit event.

Creating the Apex Trigger to write to Chatter

  1. Create a new Apex Trigger and paste in the following snippet:

trigger CreateMessage on messageRecieved__e (after insert) {
 List<FeedItem> itemsToSave = new List<FeedItem>();
    for(messageRecieved__e ev: trigger.new) {
        FeedItem item = new FeedItem();
        item.ParentId = ev.recordId__c;
        item.Body = ev.message__c;
        itemsToSave.add(item);
    }
    insert itemsToSave;
}

Some specific callouts:

  • messageRecieved__e is the Platform event API name created.

  • message__c is the message custom field API name

  • recordId__c is the record custom field API name

  1. Save the Apex Trigger.

Setting up the Outbound Event in Airkit

Configuring the config API

  1. Navigate to Triggers > App APIs > config endpoint.

  2. Edit the transform data operation that is currently setting the appUrl and sdkConfig to include the platform event that was created.

{
  "appUrl": "https://app.airkit.com/sdk-sfdc-ismaen/sdk",
  "sdkConfig": { "renderMode": "inline" },
  "events": [ "messageRecieved__e" ]
}

Configuring the Embedded Outgoing Event

  1. Navigate to the studio and go to Connections > Outgoing Events > Create new Outgoing event.

  1. Click on the event created and add in the Platform Event API name into the Identifiers > Key property.

  1. Then add the variables that map to the custom fields that were created. The names of the variables should correspond to the custom field API Names.

  1. After publishing, you can run this event on any action chain such as a button and pass in values into the inputs to write data from Airkit to the Chatter feed:

URL: Base domain:

Go to and Edit your app and go to Settings.

Add the instance as the Target Hostname.

events: Comma delimited list of to emit into Airkit

Take the config endpoint that was created in and pass it into the configUrl property on the lightning component.

You can set up from Salesforce that can emit events and data into Airkit. For example, you can trigger off an action chain in Airkit that updates the UI and sends a text message, whenever a status changes on a Salesforce case to completed and have it pertain to the existing session that is being run on the lightning component.

In Identifiers > Key add /data/CaseChangeEvent. This key is dependent on what change event object you select. For standard objects, the key will follow the pattern of /data/<Standard_Object_Name>ChangeEvent For more information, see .

You can trigger off from Airkit into Salesforce using Airkit's Outgoing events. This allows you to pass data from Airkit back into Salesforce in real-time.

https://app.airkit.com/{trigger}
https://app.airkit.com
studio.airkit.com
domain of your Salesforce
change events in Salesforce
this step
data capture events
here
platform events
Salesforce App Exchange